<?xml version='1.0' encoding='utf-8' ?>
<?xml-stylesheet type="text/xsl" href="header_e.xsl" ?>
<body PageTitle="How to add a script to the Blender menu" PageHeader="Tutorials">
<br/>
<div>
<p>
Many Blender Python scripts are prepared in a special way, which allows them to appear in 
the Blender Scripts menu, automatically. Usually such scripts are prepared for the wider audience. 
A good practice is to maintain an additional directory for your scripts, and point it to Blender.
To enable this functionality, you need:
</p>
<ol type="1">
	<li>prepare the directory for Blender scripts, you want to appear in the menu (not every script can do that);</li>
	<li>place the scripts there;</li>
	<li>set this directory as the “user script directory” in the Blender settings;</li>
</ol>
<p>
I strongly suggest to create such subdirectory. Scripts, located there, are independent of 
Blender upgrades, which is very useful, on the long term.
</p>
</div>
<br/>
<div class="subheader">Prepare directory for Blender scripts</div>
<div>
<p>
It can be located anywhere on your computer. Inside this directory you should create a 
subdirectory named <b>bpydata</b>. Inside bpydata – another subdirectory, named <b>config</b>. 
These two directories are required to enable scripts to preserve their local data 
(if any of them need to do it).
</p>
<p>
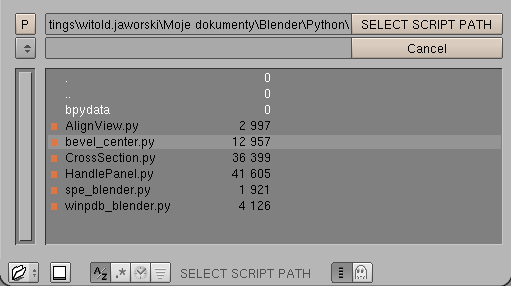
When the directory is crated, place the scripts, you want to use, there. The content of the 
script directory can look like this on the Fig. 2.
</p>
</div>
<div class="subheader">Change the Blender settings</div>
<div>
<p/>
<span>Open the <b>User Preferences</b> window, and press the toggle <b>File Paths</b> (as on Fig. 1):</span>
<br/>
<table cellSpacing="0" cellPadding="0pt" align="left">
	<tr align="center" valign="top">
		<td>
			<A href="images/scripts/010/image01.png" target="_blank" title="click to see larger image">
				<IMG src="images/scripts/010/image01s_e.png" align="center"/>
			</A>
		</td>
	</tr>
	<tr align="center" valign="top">
		<td><spanl>Fig. 1. Field for the user's Python scripts directory in the Blender settings.</spanl></td>
	</tr>
</table>
</div>
<divf>
<p>
On the screen, that will appear, there is the field for the Python directory  name 
(second column, at the bottom). Type it there, or use the small “folder” button on the right, 
to point Blender the directory, you have prepared (like on Fig. 2):
</p>
</divf>
<div>
<table cellSpacing="0" cellPadding="0pt" align="left">
	<tr align="center" valign="top">
		<td>
			<A href="images/scripts/010/image03.png" target="_blank" title="click to see larger image">
				<IMG src="images/scripts/010/image03.png" align="center"/>
			</A>
		</td>
	</tr>
	<tr align="center" valign="top">
		<td><spanl>Fig. 2. A user's Python scripts directory</spanl></td>
	</tr>
</table>
</div>
<divf>
<p>In effect, the name of this folder is placed in the Blender settings as the path to the scripts (Fig. 3):</p>
</divf>
<div>
<table cellSpacing="0" cellPadding="0pt" align="left">
	<tr align="center" valign="top">
		<td>
			<A href="images/scripts/010/image02.png" target="_blank" title="click to see larger image">
				<IMG src="images/scripts/010/image02s_e.png" align="center"/>
			</A>
		</td>
	</tr>
	<tr align="center" valign="top">
		<td><spanl>Fig. 3. The user's Python scripts directory set in Blender's settings</spanl></td>
	</tr>
</table>
</div>
<divf>
<p>
When the Python directory is set, save this setting, using from <b>File=>Save Default Settings</b> command (<b>[Ctrl]-[U]</b>). 
It will change it in all Blender files (also the existing ones).
</p>
<p>
Blender searches this directory for script files eligible to be placed in the menu. This search is performed
on the start of the program. To force it while Blender is already running, press the second small button, 
located on the left side of Python directory “folder” button (Fig. 3). 
This update the Blender’s Scripts menus. You can do it also issuing command <b>Scripts=>Update menus</b> 
from the Scripts window.
</p>
<p>
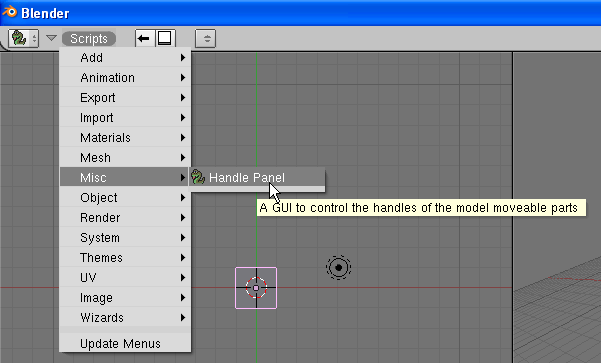
When it finds something eligible, it is immediately visible in the Scripts menu (Fig. 4):
</p>
</divf>
<div>
<table cellSpacing="0" cellPadding="0pt" align="left">
	<tr align="center" valign="top">
		<td>
			<A href="images/scripts/010/image04.png" target="_blank" title="click to see larger image">
				<IMG src="images/scripts/010/image04.png" align="center"/>
			</A>
		</td>
	</tr>
	<tr align="center" valign="top">
		<td><spanl>Fig. 4. Script from user's directory, placed in the menu.</spanl></td>
	</tr>
</table>
</div>
<divf>
<p>
This “Handle Panel.py” was just one of the scripts, placed in our Python directory. 
Now it is available in the Blender menus. You will also find some of these script commands in 
the 3D View under <b>Object=>Scripts</b>. 
</p>
</divf>
</body>
